How To Remove Those Ugly Clothing Pills From Vintage Clothes


So you've got yourself a new crewneck, sweater, sweatpants, whatever, and damn is it fire. It was the come-up of the month so far and you're ready to put it on and show the world. Problem is, there's all kinds of nasty hardened balls of fabric everywhere. It looks like trash. And if it looks like trash, you're trash.
Here's what's going on. Those little balls of fabric — often called "pills" — are broken fibers on the surface that got tangled together. Kind of like mini dreadlocks on clothes. It can happen everywhere on a piece of clothing but more often than not it's worse in areas that rub together or see more action throughout normal everyday wear. It's mostly unavoidable, but super easy to fix when it gets bad.
WHAT YOU'LL NEED

That right there is our favorite fabric shaver, but there's plenty more out there in the marketplace. This one we found to be the most economical option that's lasted through hundreds of uses so far with nary an issue to speak of. When we posted about it on social media, several people said they love it too, but also said to splurge for the more expensive rechargeable one to save money in the long run (great idea tbh).
WHERE TO START
While self explanatory for most, here's how you go about getting rid of pills. Simply turn on the machine and run over the problematic areas with the face down toward the fabric. You'll see that it makes quick work of those unsightly dreads which immediately allows for the piece to shine like it's new again.
TIPS & TRICKS
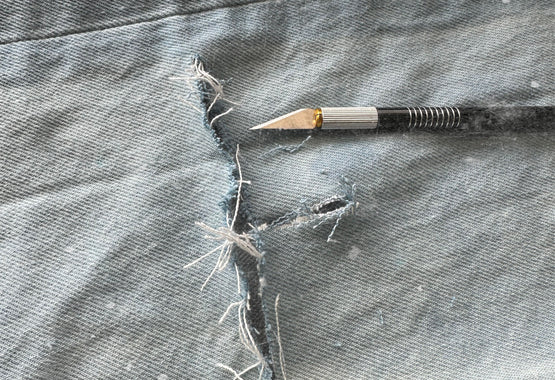
Don't: Go too quickly or get it caught on fragile edges (it can cut right through and make a hole in the fabric).
Don't: Overheat the machine. The catching reservoir fills up quick and can ruin the motor if it doesn't get proper airflow.
Do: Splurge for the rechargeable one. It saves money and battery waste in the long run.
Do: The inside of the garment too. It adds a finely detailed touch to the finished product!